Electronics
How to Install Junction Boxes At Home
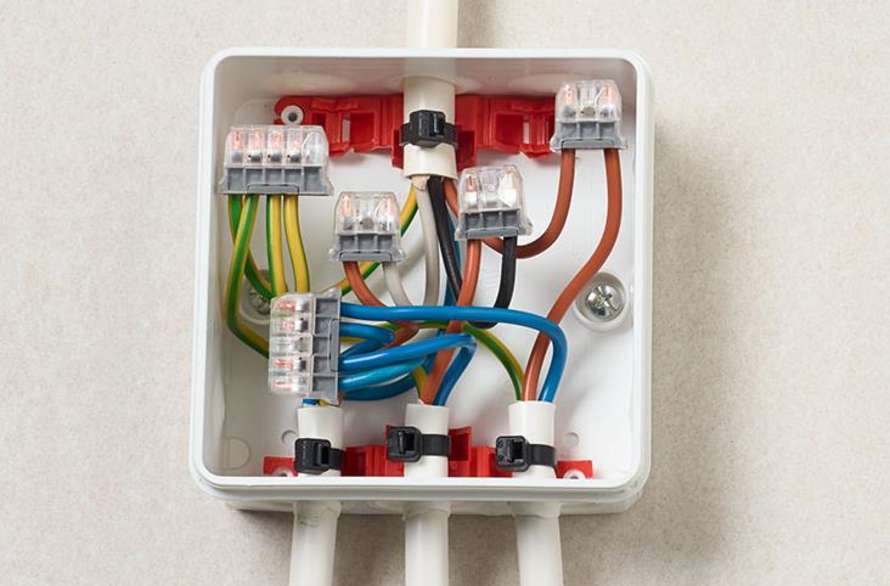
Electricity is the most responsible factor for many technological advancements. One such simple, yet important electrical component that plays a crucial role in how electricity is distributed in our homes and workplaces is the junction box. Junction boxes are the metal and plastic boxes you see embedded into the walls of buildings and houses. Full of wires, they are essential for your household’s electrical wiring system. They are the heart of all your appliances, as they supply them with electricity. In other words, a junction box is the meeting spot for all electrical wires that run through your house or facility. These boxes function by having all the wires go through an electrical panel that then sends them to an electric power outlet. J-boxes usually come in sizes of 5x7cm or if they can house more than five wires, they come at 5x7cm but with a depth of about 9cm. They are not that big, but they play a crucial role, as they act like connection points for devices and appliances.
Are Junction Boxes Safe?
If installed properly, j-boxes are as safe as can be. Otherwise, they’re at risk of getting caught on fire from potential sparks. Properly installed junction boxes will keep your electrical installation and power sockets safe. In fact, that’s one of the more important roles they play in your electrical system.
How to Install a Electrical Junction Box
What You’ll Need
Much like any type of installation, in order to install a junction box, you need to have some equipment and tools to ensure everything goes smoothly. These include a non-contact voltage tester, hammer, drill-driver, wire strippers, pliers, screwdriver, cable clamps, wood screws, and wire connectors.

Installation Process
1. First things first, you need to ensure that you’re going to be safe when performing the installation. Start off by shutting down the power to the circuit you’ll be working on. Then, test all the wires you’ll be working with using the non-contact tester. No voltage should be present in them whatsoever. Once that’s done, you’ll need to remove the knockout for each cable that goes into the box using the hammer. Then, use the pliers to twist off the metal knockout disk. This is only necessary if you’re installing a metal conduit box, otherwise, you should skip this step and continue by clamping each cable.
2. Install the cable clamp using a ring-shaped nut and tighten it with pliers. If your box has internal clamps then you don’t need to do this. Next, you need to mount the box by separating the circuit wires at the existing splice and loosen the cables to make room for the conduit box. Make sure to anchor the box to the framing with the help of some screws.
3. Next, secure the cables through the clamps into the box with the sheathing of each cable extending anywhere from 6mm to 1.2cm into the box and past the clamp. The individual conducting wires should go about 15cm into the box. Trim the wires if necessary, and make sure to strip about 2cm of the wire’s insulation at the very end with the help of wire strippers.
4. Then, secure the cables by tightening the clamps on the screws. Be careful not to over-tighten them, as you can end up damaging the cables. If you’re installing a plastic box you will usually have spring-tabs for the clamps which do not require tightening.
5. Now, join the wires together using approved wire connectors by joining the bare copper ground wires first. If your box is made of metal, then you need to add a pigtail with 15cm of the length of the same type of wire to that of the ground connection. After that’s done, connect the loose end of that pigtail to the ground screw on the box itself. These are usually special green wire nut connectors used to join multiple grounding wires together. Make sure the ends of each wire are clean, with no visible damage. Before you join them. If there are damaged wires, make sure you remove them using the wire strippers.
6. In case your box is made of plastic you don’t need to do this, just join the white (neutral) wires together. Then, go ahead and join the black (hot) wires using an approved connector or a wire nut for each pair as you go. If you see any red (hot) wires, join them together, and once that’s done, just confirm that all the wires in the box are properly secured. Do this by tugging gently on each wire.
7. Finish installing the junction box by folding the wires into it carefully, and installing the box cover with the two screws provided for it. Then, just restore the power to the circuit and you’re done! You’ll have a fully functional and safe j-box that provides power to all the outlets around your home or facility.


